OL Monitor 2.0 released
Read all about it here:
Folders used by Ol Monitor
Ol Monitor does it’s best to restrict the folders it works with to just one, the “Public\Documents\OlMonitor” folder.
Normally the Public folder is found on the C drive:
“C:\Users\Public\Documents\
“C:\Users\Public\Documents\
Of course Ol Monitor does read (but not write), to it’s folder in Program Files:
“C:\Program Files (x86)\OLMonitor VIM”
“C:\Program Files (x86)\OLMonitor VIM”
Normally you would never have to check file permissions on this folder.
The other folder you might have to set is the Smarterm Sessions folder.
Where/how to find the Smarterm Sessions folder:
The most likely locations will be:
“C:\Users\Public\Documents\
“C:\Users\{username}\Documents\
The most likely locations will be:
“C:\Users\Public\Documents\
“C:\Users\{username}\Documents\
Some older versions of Smarterm would put it in the Program Files directory:
“C:\Program Files\Esker\SmarTerm\Common\
“C:\Program Files\Esker\SmarTerm\Common\
OlMonitor will attempt to change the Session folder location to be the OlMonitor folder in Public Docs, but it’s often not allowed to make the change.
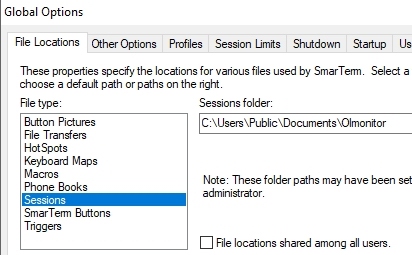
Easy way to be certain which folder Smarterm uses:
You can check the location of the Session folder by loading up Smarterm:
And clicking Properties-Global options:
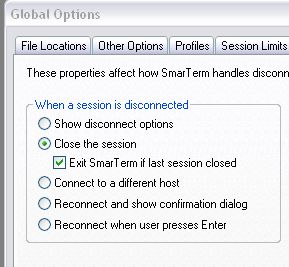
Then select “Sessions” under File Locations:
While you’re at it you might check that Ol Monitor has access to the Macros folder as well. Ol Monitor does not even use this folder but it will check there to make sure there is a default macro file. When Smarterm cannot locate the default macro file it gives an error which can prevent Ol Monitor from continuing. So, to avoid the error, Ol Monitor will attempt to write a default macro file to that folder if it cannot find one there already
Precompiled files:.
Only during installation, Ol Monitor will need to write it’s Smarterm macro files directly to the Smarterm exe folder in Program Files:
Normally this is:
“C:\Program Files (x86)\Esker\SmarTerm”
“C:\Program Files (x86)\Esker\SmarTerm”
Ol Monitor does check the precompiled files in this folder to make sure they are present and the right version. If Ol Monitor cannot access the folder you may get some error messages but it should go ahead and work fine.
More info on precompiled files:
Finally there are options to have Ol Monitor encrypt all the files it uses. More info on that:
Fix for Smarterm macro error: “Error in line: Script is too large to be compiled”
I had long been besieged by this error, and I know I can’t be the only one. I could find nothing regarding this error in the manual, the help file, or even endless Googling. Splitting your code out to multiple .stm macro files is the easy answer. But that is problematic because passing variables to functions between macro files is iffy at best. I don’t think it’s even possible without using precompiled files.
I finally stumbled across this forum post.
http://www.pstnet.com/forum/Topic1767-5-1.aspx
It was about some psychology software tool but apparently the same principle applies.
That led me to this: http://www.pstnet.com/support/kb.asp?TopicID=1300
Remove string literals. That’s it. You may not remember what a string literal is, in your subs or functions, if you put some text within quotes: sName = “Beverly” that is a string literal. I found that I use these all over the place. When you record a macro and then look at the code it uses string literals. The code samples in the macro guide are littered with literals. So I’d always assumed that this was the proper way to do things.
Anyway so what to do? You can’t just remove these string literals they are essential. One easy thing to do is replace anything you can with one of the built in constants.
So instead of using “” use ebNullString.
Sub Test1()
    If x = "" Then
         Exit Sub
    End If

    'Change it to this:
    If x = ebNullString Then
         Exit Sub
    End If
End Sub
I was able to do a search and replace and found that I’d used “” all over the place.
If you need even more space take it a step further, replace string literals with constants.
‘For those string literals you create, make a constant instead:
Sub ChooseLoop()
     If sName = "West" Then
        Call WestLoop()
     Else
        Call EastLoop()
     End If
End Sub

'Outside the sub declare a constant instead:
Const WEST = "West"

Sub ChooseLoop()
     If sName = WEST Then
        Call WestLoop()
     Else
        Call EastLoop()
     End If
End Sub
By replacing just a couple of my commonly used string literals, I gained an extra 37 lines of compile space!
Creating a mini calendar inside an excel spreadsheet
Whilst creating various turn-around-time reports, I thought it would be helpful to add a little calendar to the spreadsheet. Here is an excel vba function that adds a mini calendar to the cell address you specify:
 Public Function MakeCalendar(intStartRow As Integer, intStartCol As Integer, strStartDate As String, strEnddate As String) As Boolean
    'Takes start row and column and prints a calendar. By Eric Ainsworth - www.synapsonic.com
    On Error GoTo Errorhandler
    Dim WeekDays() As String 'little array for S-Sat
    WeekDays = Split("Sun,Mon,Tue,Wed,Thu,Fri,Sat", ",")
    Dim intX As Integer
    Dim intY As Integer
    Dim intCals As Integer
    Dim strMonth As String
    Dim intRow As Integer
    Dim intDay As Integer
    Dim intMonths As Integer
    If Month(strStartDate) = Month(strEnddate) Then
        'Same month
        intMonths = 1
    Else
        ‘Only set up to handle 2 months here.
        intMonths = 2
    End If

    For intCals = 1 To intMonths 'just once if same month
        If intCals = 1 Then 'first month
            strMonth = Month(strStartDate)
        Else
            strMonth = Month(strEnddate)
        End If

        If intCals > 1 Then 'move everythuing over to right
            intStartCol = intStartCol + 7
        End If

        For intY = LBound(WeekDays) To UBound(WeekDays)
            Cells(intStartRow + 1, intStartCol + intY).Value = WeekDays(intY)
            If intY = 3 Then 'put month
                If intCals = 1 Then
                    Cells(intStartRow, intStartCol + intY).Value = Format(strStartDate, "mmm")
                Else
                    Cells(intStartRow, intStartCol + intY).Value = Format(strEnddate, "mmm")
                End If 'end if intcals
            End If 'end if wed

            Range(Cells(intStartRow, intStartCol + intY), Cells(intStartRow + 1, intStartCol + intY)).Select
            Selection.HorizontalAlignment = xlCenter
            With Selection.Interior
                .Pattern = xlSolid
                .PatternColorIndex = xlAutomatic
                .ThemeColor = xlThemeColorDark1
                .TintAndShade = -0.149998474074526
                .PatternTintAndShade = 0
            End With
        Next intY 'next weekday

        intStartRow = intStartRow + 1

        intRow = 0
        For intX = 1 To 31 'day of month
            If Not IsDate(strMonth & " " & Format(CStr(intX), "00") & " " & Year(strStartDate)) Then
                Debug.Print "MakeCalendar: Last day of month " & strMonth & " was: " & intX - 1
                'Debug.Print strMonth & " " & Format(CStr(intX), "00") & " " & Year(strStartDate) & " not a date"
                Exit For
            End If

            intDay = Weekday(strMonth & " " & Format(CStr(intX), "00") & " " & Year(strStartDate)) 'as it is this will break over new years

            Cells(intStartRow + intRow + 1, intDay + intStartCol - 1).Value = intX
            Cells(intStartRow + intRow + 1, intDay + intStartCol - 1).HorizontalAlignment = xlCenter

            If DateDiff("d", strMonth & " " & Format(CStr(intX), "00") & " " & Year(strStartDate), strStartDate) = 0 Or DateDiff("d", strMonth & " " & Format(CStr(intX), "00") & " " & Year(strStartDate), strEnddate) = 0 Then
                Cells(intStartRow + intRow + 1, intDay + intStartCol - 1).Font.Bold = True
            End If

            'Columns(intDay + intStartCol - 1).EntireColumn.AutoFit 'cant do this it messes up stuff above

            Select Case intDay
                Case 1 'sunday
                    Cells(intStartRow + intRow + 1, intDay + intStartCol - 1).Borders(xlEdgeLeft).LineStyle = xlContinuous
                Case 2 'monday
                Case 3
                Case 4 'wed
                Case 5 'thur
                Case 6 'fri
                Case 7 'sat
                        Cells(intStartRow + intRow + 1, intDay + intStartCol - 1).Borders(xlEdgeRight).LineStyle = xlContinuous
                        intRow = intRow + 1
            End Select

        Next intX 'next day

        intStartRow = intStartRow - 1
    Next intCals 'next calendar

    Exit Function
Errorhandler:
    Debug.Print Err.Description & " " & Err.Number
    Resume Next
End Function
This is how you would call it:
Public Sub Test()
    Debug.Print MakeCalendar(1, 1, "5/1/2012", "5/31/2012")
End Sub

Email archive
If you are new to this list, you may not have gotten these previous emails:
1. Website announcement – Joke Intro,
2. Jokes 2
3. You know your instrument is a piece of junk when…
4. Excel Macro tutorial online, minor OL Monitor updates
5. May 2010 Ol Monitor/DragInfo program updates & new feature poll
6. On OL Monitor ‘not working’ with 6.4.
7. OL Monitor Budget n Bugfixes
8. Testers needed for pending log module
9. Pending log module ready
10. Windows 7, HRP, and new field.
11. 2 new Ol Monitor-related programs available, more Windows 7 info, and HRP beta.
12. Ol Monitor HRP ready, CPL labs added, and some new features.
13. OL Monitor Fall 2014 Newsletter – Ol Monitor HRP ready, CPL labs added, and some new features.
14. Ol Monitor Spring 2015 – ADT Error log, HRP ONP (Orders not processed), PL module, and a powerpoint.
DragInfo Version 1.004 sync with text file
Synchronizing with text file:
DragInfo now supports synchronizing with a plaintext file. Changes to the xml file will update the plaintext file and vice versa.
Any snippets that exist in the xml file already or that you create will also be created within the text file.
On the other hand, DragInfo ignores any info in the text file that does not match a tab title.
Lets say you have you have a tab named “Dog”. If a line is detected in the plaintext file with the word “Dog” (no other words on same line), the info below it will be treated as the snippet info. The program knows the snippet for “Dog” ends when it sees more than 2 blank lines, the end of the file, or the name of another tab.
…
How to combine/copy multiple workbooks into one workbook.
A lab billing macro example
Here is another useful macro for copying data from multiple workbooks into one workbook. At the end of the month billing needs a report with all the months charges listed. We have been creating a workbook daily with the day’s charges listed. Now we have to collate all those workbooks into one workbook. Again it’s a tedious process in need of automation.
Turn-Around-Time Excel macro
Once again we have reports that the system has chucked out that need a lot of work. In this example we are reporting the turn-around-times for a monthly report. In this example, the Cerner Powervision app gives us a report on each tests’ TAT. This report is exported to Excel and the user counts how many tests exceeded TAT, and calculates the percent meeting target TAT. TEDIOUS! Excel macros to the rescue:
Instead of making this into a full-blown tutorial I will just list the sticking points and post the macro. If you have any questions just add a comment.
What to do when you can’t use Personal.xlsb to store your macros: (only for people using Personal.xlsb otherwise skip this)
The Powervision app exports the reports to Excel, but it’s not loading my Personal macros file. This is because it’s running a Citrix Excel (I’m guessing) instead of using my pc’s excel. For this you just have to put your macro code into a workbook, and then load that workbook with the Citrix excel along with the exported report. Your macro code can still do everything it needs to, having Personal macros is just a convenience. I have named my workbook “ProcessTATexportsMacroXl2003.xls”. It doesn’t actually have or import any data, it just contains my macro code.
The app exports each report to a separate workbook, this leads to another problem:
Excel Macro Tutorial 6 – Add macro buttons to your toolbar
The finishing touch will be to put your macros into the toolbar, so they will be available to you every time you open up excel.
I have been working with Excel 2007 in these tutorials but up to this point everything I have shown you will work with 2003 and most other versions. With 2007 Microsoft removed the ability to (without tricky tweaking) make a custom drop-down menu in Excel. But they did make it easy to add a custom button to the quick access bar for a single macro. For a great tutorial on adding custom menus to 2003 see this page: Assign a Macro to a Toolbar or Menu. For 2007 see my tutorial below.
Adding a custom macro button to the Excel 2007 quick access toolbar:
The first thing to do is make sure you’ve been putting your macro code in the right place. If you put the code in the workbook it will be available to anyone who opens that file. But in this example we open and process a new workbook every day. So we should put the code in our personal macro file. This makes it available to you every time you open Excel. Open the visual basic editor to look at your files: …