Excel Macro Tutorial 1 – Open a text file
In this 6-part series of tutorials, I show you how I was able to automate a process that took 5-10 minutes per report. Now the process takes about 30 seconds. The techniques and code examples from these tutorials can be adapted and used by anyone who has the misfortune of being delegated to do tedious gruntwork in Excel. Many concepts like ‘how to record a macro in Excel’ are NOT covered in this tutorial. There are plenty of tutorials on the web covering the basics of Excel macros. Instead this tutorial fills in the gaps by explaining a real-world example from start to finish.
How to open a text file with an Excel Macro:
Often you have a text file report generated by the system that you have to import into Excel. After importing you manipulate, sort, and format the data. This process is repetitive and can be automated using an Excel macro.
For this tutorial I will show you how I made a macro to automate a daily billing report generated by the lab system.
The text file is always in the same format, so we can automate this part of the process. The lab system lets us save this report as a text file.
Even seasoned macro writers will record their actions in excel first and then modify the recorded code.
So I click the record macro button in Excel and record the steps I take to open the file.
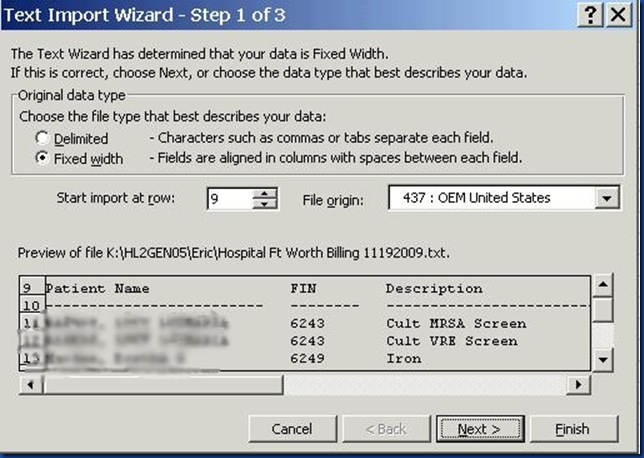
In excel I open the text file and use the import data wizard that pops up:

Instead of recording ALL the stuff I do with the report I prefer to take it step by step. This makes it easier to understand and easier to troubleshoot or modify later on. I recorded the opening of the text file and here is the resulting code:
.
Sub OpenBillingTextFile()
'
' OpenBillingTextFile Macro
' Macro recorded 11/15/2009 by
'

'
    Workbooks.OpenText Filename:= _
        "K:\HL2GEN05\Eric\Billing 11152009.txt", Origin:= _
        437, StartRow:=9, DataType:=xlFixedWidth, FieldInfo:=Array(Array(0, 1), _
        Array(25, 1), Array(35, 1), Array(74, 1), Array(82, 1), Array(93, 1), Array(100, 1), Array( _
        110, 1)), TrailingMinusNumbers:=True
End Sub
Be sure to give your macro a descriptive name instead of ‘Macro1’ or something.
Now we can modify this recorded code to make it possible to open subsequent files in the same fashion.
Clearly we can’t have the macro opening the same file each time. So I’ll use the code the macro recorded and add a file open dialog so the user can select the file to open:
Sub OpenBillingTextFile()
'
' OpenBillingTextFile Macro
' Macro recorded 11/15/2009 by
'

'
Dim FileName As String
FileName = Application.GetOpenFilename(FileFilter:="Text Files (*.txt), *.txt,dat (*.dat), *.dat", Title:="Please select a file")

If CStr(FileName) <> "False"
    Workbooks.OpenText FileName:= _
        FileName, Origin:= _
        437, StartRow:=9, DataType:=xlFixedWidth, FieldInfo:=Array(Array(0, 1), _
        Array(25, 1), Array(35, 1), Array(74, 1), Array(82, 1), Array(93, 1), Array(100, 1), Array( _
        110, 1)), TrailingMinusNumbers:=True

Else 'user pressed cancel
End If
End Sub
So we’ve saved several steps here. Now instead of clicking File-Open and going through the text file import wizard we just run the macro and select the file!
Look at the difference between the recorded code and the modified code. With the new macro the user will get an open file dialog box that lets them browse for text files to open.
If you are asking “Where did you get this command ‘Application.GetOpenFileName’?”, I will answer your question with another question: “Where do you go to get any commands and code for Excel Macros?”. 3 places: Google, Amazon books, and forums/blogs. Reference books on excel vba are great to have handy for looking up how to do something. As for Google, you search for “vba code to open a file” and see where it takes you. Finally after Googling for awhile you will usually find a forum or blog dedicated to excel vba where you can get all kinds of free advice. I will gather up my favorite books and forums and list them at the end of this series.
Back to the macro:
Just getting to the macro player window is a bit of a chore, so in the last part of this tutorial I will show you how to add a custom menu directly into your copy of Excel!
In the next tutorials I will go through how to create macros to format the columns, remove junk headers and footers, check for duplicate tests, delete non-chargeable tests, and flag credited tests!
Next: Formatting the columns and column headers.
Excel Macro Tutorial 1 – Open a text file
Excel Macro Tutorial 2 – Formatting the Columns and Column headers
Excel Macro Tutorial 3 – Remove header rows and delete junk loop
Excel Macro Tutorial 4 – Delete non-chargeable tests and sort
Excel Macro Tutorial 5 – Delete cancelled tests, flag credited tests